SAFE Block runs XP automatically when the computer boots. It has an icon in the tray as shown here.

The SAFE Block XP interface can be invoked by double clicking on the tray icon, by double clicking the desktop icon, or by accessing it through the Programs menu.
Initial Password. The first time that the SAFE Block XP interface is invoked after installation, it will ask for a password. This password can be left blank if you do not wish to have a password protecting access to the SAFE Block XP interface.
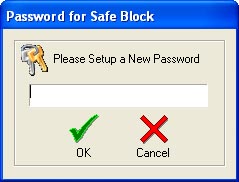
If you set a password, this password must be used to access the features of SAFE Block XP. If you forget your password, uninstalling SAFE Block XP and re-installing it will allow you to reset it.
Blocking/Unblocking Drives. The main SAFE Block XP interface is shown here:
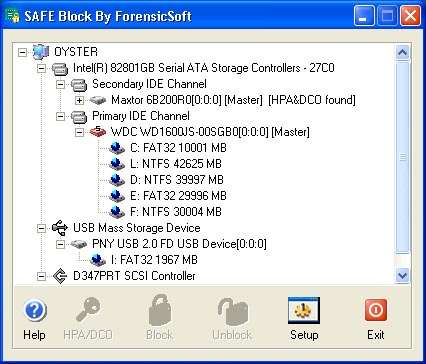
The interface shows a device tree organized by the system's bus controllers (IDE, SCSI, USB). IDE and SCSI controllers have sub trees for each channel. The next level under each controller is the physical device. Any logical drives and partitions on the physical device are listed under that physical device. Write blocking and unblocking takes place at the physical device level. Logical drives and partitions are listed for information purposes only. You cannot block at the logical device/partition level.
To block a drive, select it by left clicking the physical device in the device tree. Click the Block or Unblock button at the bottom of the main interface. A blocked device will have a padlock icon superimposed over its icon in the device tree.
The system disk(s), which includes the disk on which the operating system and SAFE Block XP itself are installed, as well as any addition disk(s) containing a system pagefile, will be indicated by a red disk with an "s" on the drive in the device tree as shown in the figure above, and cannot be blocked.
CD and DVD drives cannot be blocked.
Blocking A Drive In Use. If you attempt to block a drive that is in use, typically because it has an open document, SAFE Block XP will inform you that you must close the files that are open on the drive, as shown here.
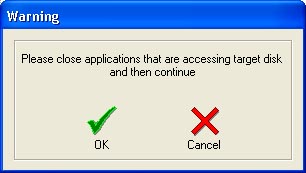
Often this involves closing the application that is accessing the drive.
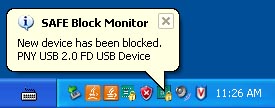
Inserting New Removable Drives. SAFE Block XP detects the insertion of a new removable drive (e.g. a USB or IEEE1394 device). It applies the default policy for the device (see the Setup Help section) and notifies the user by a message in the taskbar tray, as show here.
Exit. The Exit button on the interface closes the SAFE Block XP interface. The Windows X box on the top right of the window does the same thing. Closing the SAFE Block XP interface does not stop SAFE Block XP from blocking devices. The interface can be re-started from the taskbar tray, desktop icon, or Start menu. To stop SAFE Block XP from blocking you must uninstall it.
IDE disks can have Host Protected Areas (HPA) and Device Configuration Overlays (DCO). These are regions at the end of the address space of a drive that are "hidden" from Windows users and applications. Typical Windows applications, such as those for imaging drives, cannot access HPAs and DCOs. SAFE Block XP detects HPAs and DCOs and allows the user to "open" them, which makes them accessible to the user's applications, and to "close" them back up so that they are inaccessible again.
Note that opening and closing an HPA/DCO does not write to the data portion of the disk (i.e. opening and then closing a DCO and/or HPA will not change the hash value of a disk. Opening a DCO and/or HPA without closing it will change the hash value of the disk since there is more data visible to the hashing application.).
When SAFE Block XP detects a DCO and/or HPA, it indicates their presence with a notation on the device tree in the left pane of the SAFE Block XP main interface as shown on the Maxtor disk on the second IDE channel here:
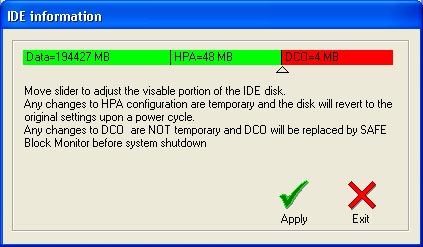
If a drive with a DCO and/or HPA is selected, then the HPA/DCO button on the main interface will be highlighted. Clicking on that button allows opening the DCO and/or HPA through the SAFE Block XP interface that comes up:

There are three possible regions that could appear on the IDE Information slider bar: data (the "normal" part of the disk that is seen by Windows), HPA, and DCO. The green portion(s) of the slider bar (see Figure above) indicates the region(s) of the IDE drive accessible to Windows applications, with the text specifying the size(s). The red portion(s) of the slider bar indicate the region(s) of the disk that are not currently accessible by Windows, and their size(s).
In the Figure above there is a data region that is accessible to Windows and an HPA and DCO that are not accessible.
Sliding the slider to the right will open (make accessible) the HPA. Further sliding will open the DCO. This is shown here:
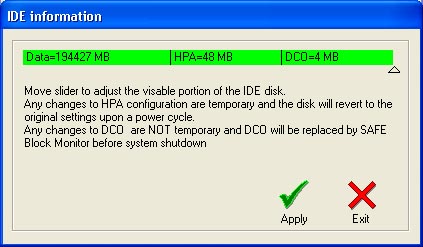
If the HPA and DCO are opened using the slider bar, Windows and SAFE Block XP will refresh, now showing you the full size of the physical disk. Note that when the DCO and/or HPA are opened using the slider, the existence of the DCO and/or HPA will no longer be shown on the main SAFE Block XP interface.
Closing the HPA and DCO. To close an HPA or DCO, slide the slider to the left.
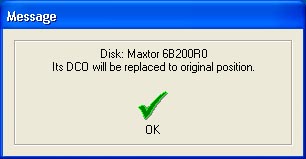
If the machine is power-cycled while a DCO and/or HPA is open, the disk will be restored to its original state with HPA/DCO closed. You will be notified of this upon your next re-boot, as shown here: